Supercharging dbt: let's build a production ready platform with dbt + Airflow (3/3)
This is what this article is about.
The Setup: what we're building
We're going to build a production-ready dbt + Airflow setup with:
- Incremental (microbatch) models with automatic time-based filtering
- Dynamic DAG generation from dbt metadata
- Environment-based configurations (dev/preprod/prod)
- Observability baked into the orchestration layer + GitHub pages
- CI/CD checks that enforce best practices
- Team conventions codified in the repo
I. Project Structure
First, let's establish a monorepo structure that treats dbt and Airflow as one cohesive application:
data-platform/
├── airflow/
│   ├── dags/
│   │   ├── dynamic/
│   │   │   └── dbt_dag_generator.py
│   │   └── utilities/
│   │       ├── alerting.py
│   │       └── observability.py
│   ├── plugins/
│   ├── config/
│   │   ├── dev.yaml
│   │   ├── preprod.yaml
│   │   └── prod.yaml
│   └── tests/
├── dbt/
│   ├── models/
│   │   ├── staging/
│   │   ├── intermediate/
│   │   └── marts/
│   ├── macros/
│   ├── tests/
│   ├── dbt_project.yml
│   └── profiles.yml
├── .github/
│   └── workflows/
│       ├── ci_dbt.yml
│       └── ci_airflow.yml
├── scripts/
│   └── deploy.sh
└── README.md
Key principles:
- Everything lives in one repo for simplified versioning
- Clear separation between orchestration and transformation
- Shared configuration for both layers
- Tests for both dbt models and Airflow DAGs
II. dbt Setup with microbatch
1. Core dbt Configuration
Let's start with dbt_project.yml that enforces our incremental-by-default approach:
name: 'data_platform'
version: '1.0.0'
config-version: 2

profile: 'data_platform'

model-paths: ["models"]
analysis-paths: ["analyses"]
test-paths: ["tests"]
seed-paths: ["seeds"]
macro-paths: ["macros"]
snapshot-paths: ["snapshots"]

models:
  data_platform:

    staging:
        # Don't forget to specify `event_time` here for optimized filtering at the mart layer
      +materialized: view #or ephemeral but views are better for debugging
      +schema: staging

    intermediate:
      # Don't forget to specify `event_time` here for optimized filtering at the mart layer
      +materialized: view
      +schema: intermediate

    marts:
      # Only microbatch for simplicity, specify batch_size in each models
      +materialized: incremental
      +incremental_strategy: microbatch
      +schema: marts
      +on_schema_change: fail

    # This enables more business facing users (DA, DS) to work on dbt on their own part of the repo
    int_exposure:
      +materialized: view
      +schema: int_activation

    exposure:
      +materialized: view
      +schema: int_activation
2. Environment variables
Let's take a look at how you should run dbt in each environment.
To do that simply, let's use a .env environment that will handle all environment variables for us & a makefile to simply run packaged commands.
a. dev (dbt)
Here your goal is to run as little data as possible but still have coherent results & understand if your data pipeline is working as you should.
It's why I'd advise you to handle this logic with these 2 files likes so:
# you can specify whatever date you want here
DATA_INTERVAL_START='2026-01-01'
DATA_INTERVAL_END='2026-01-10'

# what profile you'd use by default on dev
DBT_TARGET='dev'
.env
Then in your profiles.yml file you'd have something like:
target:  "{{ env_var('DBT_TARGET') }}"
  outputs:
    dev:
      token:  "{{ env_var('DBT_TOKEN') }}"  # NEVER write token directly in this file !
      # other specific warehouse configurations

    preprod:
      token:  "{{ env_var('DBT_TOKEN') }}"  # NEVER write token directly in this file !
      # other specific warehouse configurations

    prod:
      token:  "{{ env_var('DBT_TOKEN') }}"  # NEVER write token directly in this file !
      # other specific warehouse configurations
profiles.yml
Your makefile would then look like that:
include .env

dbt-run:
  dbt run -s $(1) --event-time-start $(EVENT_TIME_START) --event-time-end $(EVENT_TIME_END)

dbt-run:
  dbt build -s $(1) --event-time-start $(EVENT_TIME_START) --event-time-end $(EVENT_TIME_END)

# etc... other dbt commands
makefile
This means that in your terminal, you'd just have to write:
make dbt-run / dbt-build "tag:<some_tag>"

make dbt-run / dbt-build "tag:<some_tag>"

make dbt-run / dbt-build "<some_model(s)>"
Terminal
To interact with dbt.
b. preprod (dbt + Airflow)
In this env, the logic is a little bit different than in dev since you have access to Airflow variables now.
By default, for each DAG, you'd have a data_interval_start / data_interval_end variable created based on your CRON + start_datetime.
Airflow is quite well made so that you don't really need to worry about what date to pass here.
Essentially in preprod, your DAG should look like that:
from airflow.models.param import Param
from cosmos import DbtDag

DbtDag(
    dag_id="dbt_cosmos_interval",
    # ... other configs

    operator_args={
        "dbt_cmd_flags": [
            "--event-time-start",
            "{{ params.DATA_INTERVAL_START or data_interval_start.isoformat() }}",
            "--event-time-end",
            "{{ params.DATA_INTERVAL_END or data_interval_end.isoformat() }}",
            "--select",
            "{{ params.MODEL_SELECTOR }}",
        ]
    },

    params={
        "DATA_INTERVAL_START": Param(default=None, type=["null", "string"]),
        "DATA_INTERVAL_END": Param(default=None, type=["null", "string"]),
        "MODEL_SELECTOR": Param(
            default="tag:microbatch",
            type="string",
        ),
    },
)
Airflow example DAG
c. prod (dbt + Airflow)
Prod is exactly the same as in preprod, the only thing that changes is your ProfileConfig:
from cosmos import ProfileConfig
from cosmos.profiles import PostgresUserPasswordProfileMapping

profile_config = ProfileConfig(
    profile_name="data_platform",
    target_name="prod",   # 👈 THIS is DBT_TARGET
    profiles_yml_filepath=DBT_PROFILES_PATH / "profiles.yml",
    # other configs ...
    ),
Example DAG Config
3. Example Incremental Model
Here's how a typical marts model would look (models/marts/fact_orders.sql):
{{
  config(
    batch_size='day',
    start_date='2024-01-01', #or any other date
    event_date='event_date',
    tags=['daily', 'orders', 'team_analytics']
  )
}}

with raw_orders as (
  select
    order_id,
    customer_id,
    order_status,
    order_total,
    created_at,
    updated_at,
    date(created_at) as event_date
  from
    {{ source('raw', 'orders') }}
),

enriched as (
  select
    raw_orders.order_id,
    raw_orders.customer_id,
    raw_orders.order_status,
    raw_orders.order_total,
    raw_orders.event_date,
    raw_orders.created_at,
    raw_orders.updated_at,
    dim_customers.customer_segment,
    '{{ run_started_at.strftime("%Y%m%d%H%M%S") }}' as dbt_loaded_at
  from
    raw_orders
    left join {{ ref('dim_customers') }} dim_customers
    on raw_orders.customer_id = dim_customers.customer_id
)

select * from enriched
fact_orders.sql
What's happening here:
- Do not use date filtering for simplicity; let dbt do the job for you
- No need to configure incremental strategy as it's already the case in
dbt_project.yml - Validates configuration on compile
- Tagged for DAG generation and team ownership
- 100% deterministic and idempotent
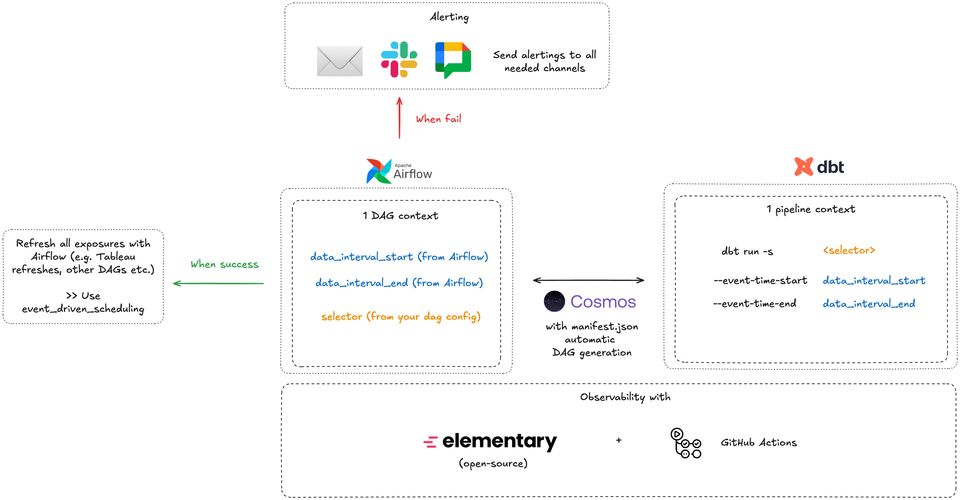
III. Airflow Integration with Cosmos
1. Install and Configure Cosmos
Add to airflow/requirements.txt:
astronomer-cosmos[your_adapter]==1.4.0
apache-airflow==2.8.0
2. Dynamic DAG Generator
Create airflow/dags/dynamic/dbt_dag_generator.py:
from datetime import datetime, timedelta
from pathlib import Path
from cosmos import DbtDag, ProjectConfig, ProfileConfig, ExecutionConfig
from cosmos.profiles import GoogleCloudServiceAccountFileProfileMapping

DBT_PROJECT_PATH = Path("/usr/local/airflow/dbt")
DBT_EXECUTABLE_PATH = "/usr/local/airflow/dbt_venv/bin/dbt"

# Define your pipeline configurations based on tags
PIPELINE_CONFIGS = {
    "daily_orders": {
        "schedule": "0 2 * * *",  # 2 AM daily
        "tags": ["daily", "orders"],
        "retries": 3,
        "retry_delay": timedelta(minutes=5),
        "sla": timedelta(hours=2),
        "owner": "team_analytics",
    },
    "weekly_aggregates": {
        "schedule": "0 3 * * 0",  # 3 AM Sundays
        "tags": ["weekly", "aggregates"],
        "retries": 2,
        "retry_delay": timedelta(minutes=10),
        "sla": timedelta(hours=4),
        "owner": "team_analytics",
    },
    "realtime_events": {
        "schedule": "*/15 * * * *",  # Every 15 minutes
        "tags": ["realtime", "events"],
        "retries": 1,
        "retry_delay": timedelta(minutes=2),
        "sla": timedelta(minutes=30),
        "owner": "team_engineering",
    },
}

profile_config = ProfileConfig(
    profile_name="data_platform",
    target_name="prod",
    profile_mapping=<Some>ServiceAccountFileProfileMapping(
        conn_id="<some_conn_id>",
        profile_args={"dataset": "analytics"},
    ),
)

execution_config = ExecutionConfig(
    dbt_executable_path=DBT_EXECUTABLE_PATH,
)

# Generate a DAG for each pipeline configuration
for dag_id, config in PIPELINE_CONFIGS.items():
    globals()[dag_id] = DbtDag(
        dag_id=dag_id,
        schedule_interval=config["schedule"],
        start_date=datetime(2024, 1, 1),
        catchup=False,
        default_args={
            "owner": config["owner"],
            "retries": config["retries"],
            "retry_delay": config["retry_delay"],
            "sla": config["sla"],
        },
        tags=config["tags"],
        project_config=ProjectConfig(
            dbt_project_path=DBT_PROJECT_PATH,
        ),
        profile_config=profile_config,
        execution_config=execution_config,
        # Select models based on tags
        operator_args={
            "select": config["tags"],
        },
        operator_args={
        "dbt_cmd_flags": [
            "--event-time-start",
            "{{ params.DATA_INTERVAL_START or data_interval_start.isoformat() }}",
            "--event-time-end",
            "{{ params.DATA_INTERVAL_END or data_interval_end.isoformat() }}",
            "--select",
            "{{ params.MODEL_SELECTOR }}",
        ]
    },
    params={
        "DATA_INTERVAL_START": Param(default=None, type=["null", "string"]),
        "DATA_INTERVAL_END": Param(default=None, type=["null", "string"]),
        "MODEL_SELECTOR": Param(
            default="tag:microbatch",
            type="string",
        ),
    },
    )
Airflow config, that's the only file you'll need !
You can also specify Pipeline Configs in a yml file.
3. Add default alerting to all your DAGs
Create a new file in airflow/dags/utils/notifications.py:
import json
import logging
from typing import Dict, Any
from airflow.providers.http.hooks.http import HttpHook
from airflow.utils.email import send_email
from airflow.models import TaskInstance

logger = logging.getLogger(__name__)


def send_google_chat_notification(webhook_url: str, message: str, context: Dict[str, Any] = None):
    """Send notification to Google Chat webhook."""
    try:
        http_hook = HttpHook(method='POST', http_conn_id='google_chat_webhook')

        # Format message card for Google Chat
        card = {
            "cards": [{
                "header": {
                    "title": "🚨 Airflow Task Failure",
                    "subtitle": context.get('task_instance').dag_id if context else "Unknown DAG",
                    "imageUrl": "https://airflow.apache.org/images/feature-image.png"
                },
                "sections": [{
                    "widgets": [
                        {
                            "keyValue": {
                                "topLabel": "Task",
                                "content": context.get('task_instance').task_id if context else "Unknown"
                            }
                        },
                        {
                            "keyValue": {
                                "topLabel": "DAG",
                                "content": context.get('task_instance').dag_id if context else "Unknown"
                            }
                        },
                        {
                            "keyValue": {
                                "topLabel": "Execution Date",
                                "content": str(context.get('execution_date')) if context else "Unknown"
                            }
                        },
                        {
                            "keyValue": {
                                "topLabel": "Log URL",
                                "content": f"<{context.get('task_instance').log_url}|View Logs>" if context else "N/A"
                            }
                        },
                        {
                            "textParagraph": {
                                "text": f"<b>Error:</b> {message}"
                            }
                        }
                    ]
                }]
            }]
        }

        # Alternative simple message format
        simple_message = {
            "text": message
        }

        response = http_hook.run(
            endpoint='',
            data=json.dumps(card),
            headers={'Content-Type': 'application/json'}
        )

        logger.info(f"Google Chat notification sent successfully: {response.status_code}")
        return response

    except Exception as e:
        logger.error(f"Failed to send Google Chat notification: {str(e)}")
        raise


def send_failure_email(context: Dict[str, Any]):
    """Send detailed failure email."""
    task_instance: TaskInstance = context.get('task_instance')
    dag_id = task_instance.dag_id
    task_id = task_instance.task_id
    execution_date = context.get('execution_date')
    log_url = task_instance.log_url
    exception = context.get('exception')

    subject = f"🚨 Airflow Task Failed: {dag_id}.{task_id}"

    html_content = f"""
    <html>
    <head>
        <style>
            body {{ font-family: Arial, sans-serif; }}
            .container {{ max-width: 600px; margin: 0 auto; padding: 20px; }}
            .header {{ background-color: #dc3545; color: white; padding: 15px; border-radius: 5px; }}
            .details {{ background-color: #f8f9fa; padding: 15px; margin-top: 20px; border-radius: 5px; }}
            .detail-row {{ margin: 10px 0; }}
            .label {{ font-weight: bold; color: #495057; }}
            .error {{ background-color: #fff3cd; padding: 10px; margin-top: 15px; border-left: 4px solid #ffc107; }}
            .button {{
                display: inline-block;
                padding: 10px 20px;
                background-color: #007bff;
                color: white;
                text-decoration: none;
                border-radius: 5px;
                margin-top: 15px;
            }}
        </style>
    </head>
    <body>
        <div class="container">
            <div class="header">
                <h2>❌ Airflow Task Failure Alert</h2>
            </div>

            <div class="details">
                <div class="detail-row">
                    <span class="label">DAG ID:</span> {dag_id}
                </div>
                <div class="detail-row">
                    <span class="label">Task ID:</span> {task_id}
                </div>
                <div class="detail-row">
                    <span class="label">Execution Date:</span> {execution_date}
                </div>
                <div class="detail-row">
                    <span class="label">Owner:</span> {task_instance.task.owner}
                </div>
                <div class="detail-row">
                    <span class="label">Try Number:</span> {task_instance.try_number}
                </div>
            </div>

            <div class="error">
                <h3>Error Details:</h3>
                <pre>{exception}</pre>
            </div>

            <a href="{log_url}" class="button">View Task Logs</a>
        </div>
    </body>
    </html>
    """

    try:
        send_email(
            to=context.get('dag').default_args.get('email', ['data-engineering@company.com']),
            subject=subject,
            html_content=html_content
        )
        logger.info(f"Failure email sent for {dag_id}.{task_id}")
    except Exception as e:
        logger.error(f"Failed to send email: {str(e)}")


def task_failure_callback(context: Dict[str, Any]):
    """
    Combined failure callback that sends both email and Google Chat notifications.
    """
    task_instance: TaskInstance = context.get('task_instance')
    exception = context.get('exception')

    # Prepare message
    message = (
        f"Task {task_instance.task_id} failed in DAG {task_instance.dag_id}\n"
        f"Execution Date: {context.get('execution_date')}\n"
        f"Error: {str(exception)}"
    )

    logger.error(message)

    # Send email notification
    try:
        send_failure_email(context)
    except Exception as e:
        logger.error(f"Email notification failed: {str(e)}")

    # Send Google Chat notification
    try:
        webhook_url = context.get('dag').default_args.get('google_chat_webhook')
        if webhook_url:
            send_google_chat_notification(webhook_url, message, context)
    except Exception as e:
        logger.error(f"Google Chat notification failed: {str(e)}")
This file lets you send a Google Chat notification (but you could do it with Slack, Teams or other services also) directly to you + your users on a group chat when a DAG fails.
To do that just add this to the previous DAG generator file:
from datetime import datetime, timedelta
from pathlib import Path
from airflow.models.param import Param
from cosmos import DbtDag, ProjectConfig, ProfileConfig, ExecutionConfig
from cosmos.profiles import GoogleCloudServiceAccountFileProfileMapping
from utils.notifications import task_failure_callback

DBT_PROJECT_PATH = Path("/usr/local/airflow/dbt")
DBT_EXECUTABLE_PATH = "/usr/local/airflow/dbt_venv/bin/dbt"

# Define your pipeline configurations based on tags
PIPELINE_CONFIGS = {
    "daily_orders": {
        "schedule": "0 2 * * *",  # 2 AM daily
        "tags": ["daily", "orders"],
        "retries": 3,
        "retry_delay": timedelta(minutes=5),
        "sla": timedelta(hours=2),
        "owner": "team_analytics",
        "email": ["analytics-team@company.com"],
        "email_on_failure": True,
    },
    "weekly_aggregates": {
        "schedule": "0 3 * * 0",  # 3 AM Sundays
        "tags": ["weekly", "aggregates"],
        "retries": 2,
        "retry_delay": timedelta(minutes=10),
        "sla": timedelta(hours=4),
        "owner": "team_analytics",
        "email": ["analytics-team@company.com"],
        "email_on_failure": True,
    },
    "realtime_events": {
        "schedule": "*/15 * * * *",  # Every 15 minutes
        "tags": ["realtime", "events"],
        "retries": 1,
        "retry_delay": timedelta(minutes=2),
        "sla": timedelta(minutes=30),
        "owner": "team_engineering",
        "email": ["engineering-team@company.com"],
        "email_on_failure": True,
    },
}

profile_config = ProfileConfig(
    profile_name="data_platform",
    target_name="prod",
    profile_mapping=GoogleCloudServiceAccountFileProfileMapping(
        conn_id="google_cloud_default",
        profile_args={"dataset": "analytics"},
    ),
)

execution_config = ExecutionConfig(
    dbt_executable_path=DBT_EXECUTABLE_PATH,
)

# Generate a DAG for each pipeline configuration
for dag_id, config in PIPELINE_CONFIGS.items():
    # Build the select expression: use MODEL_SELECTOR param if provided, otherwise use tags
    select_expression = "{{ params.MODEL_SELECTOR if params.MODEL_SELECTOR else 'tag:' + ',tag:'.join(" + str(config["tags"]) + ") }}"

    globals()[dag_id] = DbtDag(
        dag_id=dag_id,
        schedule_interval=config["schedule"],
        start_date=datetime(2024, 1, 1),
        catchup=False,
        default_args={
            "owner": config["owner"],
            "retries": config["retries"],
            "retry_delay": config["retry_delay"],
            "sla": config["sla"],
            "email": config.get("email", []),
            "email_on_failure": config.get("email_on_failure", True),
            "email_on_retry": config.get("email_on_retry", False),
            "on_failure_callback": task_failure_callback,
        },
        tags=config["tags"],
        project_config=ProjectConfig(
            dbt_project_path=DBT_PROJECT_PATH,
        ),
        profile_config=profile_config,
        execution_config=execution_config,
        # FIXED: Single operator_args with all flags combined
        operator_args={
            "dbt_cmd_flags": [
                "--event-time-start",
                "{{ params.DATA_INTERVAL_START or data_interval_start.isoformat() }}",
                "--event-time-end",
                "{{ params.DATA_INTERVAL_END or data_interval_end.isoformat() }}",
                "--select",
                f"{{{{ params.MODEL_SELECTOR or 'tag:{',tag:'.join(config['tags'])}' }}}}",
                "{% if params.FULL_REFRESH == 'true' %}--full-refresh{% endif %}",
            ],
        },
        params={
            "DATA_INTERVAL_START": Param(
                default=None,
                type=["null", "string"],
                description="Start of the data interval (ISO format). Defaults to data_interval_start if not provided."
            ),
            "DATA_INTERVAL_END": Param(
                default=None,
                type=["null", "string"],
                description="End of the data interval (ISO format). Defaults to data_interval_end if not provided."
            ),
            "MODEL_SELECTOR": Param(
                default=None,
                type=["null", "string"],
                description=f"Custom dbt selector. Defaults to tags: {', '.join(config['tags'])}. Examples: 'model_name', 'tag:critical', 'path:marts/'"
            ),
            "FULL_REFRESH": Param(
                default="false",
                type="string",
                enum=["true", "false"],
                description="Set to 'true' to perform a full refresh of incremental models. WARNING: This will rebuild all tables from scratch."
            ),
        },
    )
Airflow config, that's the only file you'll need !
IV. Adding observability built into Airflow (prod only)
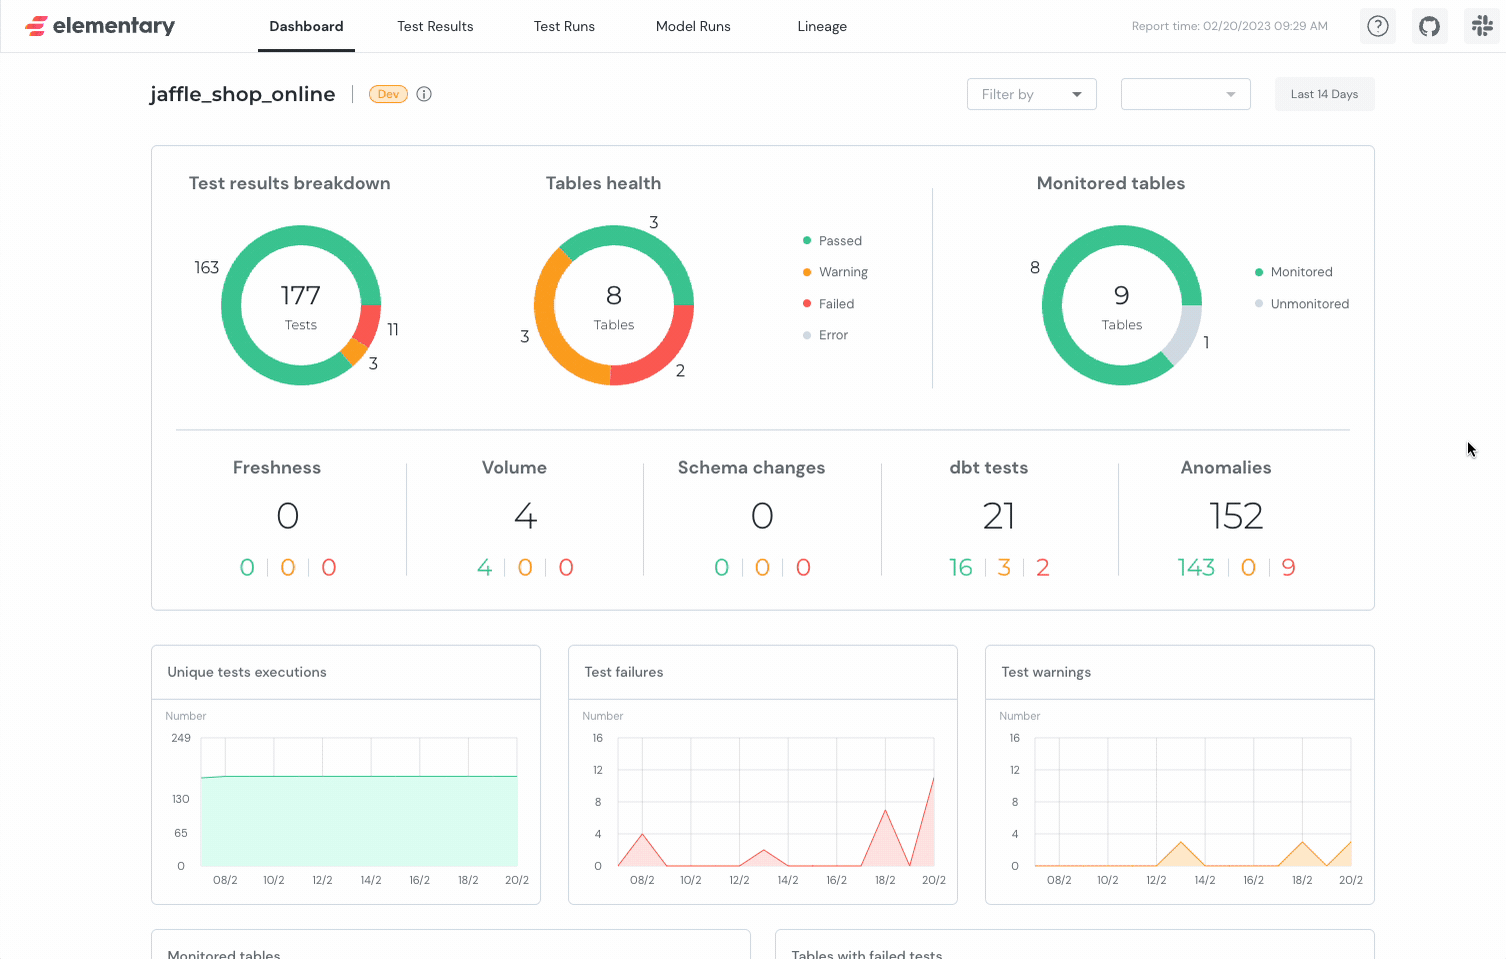
1. Let's use Elementary open-source
Elementary is a CLI tool that let's you self-host the Elementary data observability report which is defined as "a comprehensive view of your dbt runs and all dbt test results, helping you track data lineage, test coverage, and overall pipeline health."
It's super simple to use & it gets you from 0 to 1 on observability super fast.
2. Setup
In your dbt packages (packages.yml) add this:
packages:
  - package: elementary-data/elementary
    version: 0.15.1  # Check for latest version
elementary package config
You can then add this config in your dbt_project.yml file:
models:
  data_platform:
    # Your existing config...

  elementary:
    +schema: elementary
    +enabled: true
dbt_project.yml
That's it! You're pretty much done with setup. You can now run:
dbt run --select elementaryTo create all elementary tables.
In your models (here we use the previous example), you can now add elementary testing:
version: 2

models:
  - name: fact_orders
    description: "Daily order facts"
    columns:
      - name: order_id
        description: "Unique order identifier"
        tests:
          - unique
          - not_null
          # Elementary anomaly detection tests
          - elementary.volume_anomalies:
              timestamp_column: "created_at"
              where_expression: "order_status != 'cancelled'"
              sensitivity: 3  # Lower = more sensitive

      - name: order_total
        tests:
          - not_null
          # Detect anomalies in order totals
          - elementary.all_columns_anomalies:
              timestamp_column: "created_at"
              sensitivity: 3
          # Ensure values are within expected range
          - elementary.dimension_anomalies:
              timestamp_column: "created_at"
              dimensions:
                - order_status
                - customer_segment

  - name: dim_customers
    columns:
      - name: customer_id
        tests:
          - unique
          - not_null
          # Detect freshness issues
          - elementary.freshness_anomalies:
              timestamp_column: "updated_at"
              sensitivity: 3
3. Airflow + hosting service integration
What you want to do here is to create a DAG for Elementary data + website to be recreated.
What this will do is:
- test your data based on elementary tests
- create static html file based on tests results
- use elementary CLI to host on S3, GCS or other
from datetime import datetime, timedelta
from pathlib import Path
from airflow import DAG
from airflow.operators.bash import BashOperator
from utils.notifications import task_failure_callback

DBT_PROJECT_PATH = Path("/usr/local/airflow/dbt")
DBT_EXECUTABLE_PATH = "/usr/local/airflow/dbt_venv/bin/dbt"

# S3/GCS bucket name (make it public or use CloudFront)
BUCKET_NAME = "your-company-elementary-reports"

default_args = {
    'owner': 'data_platform',
    'depends_on_past': False,
    'email': ['data-engineering@company.com'],
    'email_on_failure': True,
    'retries': 2,
    'retry_delay': timedelta(minutes=5),
    'on_failure_callback': task_failure_callback,
}

with DAG(
    dag_id='elementary_monitoring',
    default_args=default_args,
    description='Elementary data quality monitoring',
    schedule_interval='0 * * * *',  # Every hour
    start_date=datetime(2024, 1, 1),
    catchup=False,
    tags=['monitoring', 'elementary', 'observability'],
    max_active_runs=1,
) as dag:

    # Step 1: Run Elementary models
    run_elementary = BashOperator(
        task_id='run_elementary_models',
        bash_command=f"""
        cd {DBT_PROJECT_PATH} && \
        {DBT_EXECUTABLE_PATH} run --select elementary
        """,
    )

    # Step 2: Generate and upload report to S3/GCS
    # This is the ONLY command needed - Elementary handles everything!
    upload_report = BashOperator(
        task_id='upload_elementary_report',
        bash_command=f"""
        cd {DBT_PROJECT_PATH} && \
        edr monitor --bucket-name {BUCKET_NAME}
        """,
    )

    run_elementary >> upload_report
In order for the bucket where you're sending your data to host a static website, you'd have to do these steps (1 to 4) for instance:
# 1. Create bucket
aws s3 mb s3://your-company-elementary-reports

# 2. Enable static website hosting
aws s3 website s3://your-company-elementary-reports \
    --index-document index.html

# 3. Make bucket public
aws s3api put-bucket-policy --bucket your-company-elementary-reports --policy '{
  "Version": "2012-10-17",
  "Statement": [{
    "Sid": "PublicReadGetObject",
    "Effect": "Allow",
    "Principal": "*",
    "Action": "s3:GetObject",
    "Resource": "arn:aws:s3:::your-company-elementary-reports/*"
  }]
}'

# 4. Configure AWS credentials in Airflow
# Set AWS_ACCESS_KEY_ID and AWS_SECRET_ACCESS_KEY as Airflow Variables
# or use IAM role if Airflow runs on EC2/EKS
Check elementary documentation for more infos!

4. UI
You'll have a super well made UI with all the things you need to take care of:
V. Pitfalls, Pros & Cons
Common Pitfalls
1. The --select Conflict
# ❌ WRONG - Creates duplicate --select flags
operator_args={
    "select": config["tags"],
    "dbt_cmd_flags": ["--select", "tag:daily"]
}

# ✅ RIGHT - Single --select in dbt_cmd_flags only
operator_args={
    "dbt_cmd_flags": [
        "--select",
        f"{{{{ params.MODEL_SELECTOR or 'tag:{',tag:'.join(config['tags'])}' }}}}"
    ]
}
2. Environment Variable Leakage
# ❌ WRONG - Defaults to prod
target: "{{ env_var('DBT_TARGET', 'prod') }}"

# ✅ RIGHT - Defaults to dev
target: "{{ env_var('DBT_TARGET', 'dev') }}"
3. CI Hitting Production
Use separate targets for CI & prod:
DBT_TARGET=ci→cidatasetDBT_TARGET=prod→proddataset
4. Elementary in Every Pipeline
# ❌ WRONG - Elementary runs 10x per day, duplicate alerts
for dag_id in pipelines:
    add_elementary_monitoring()

# ✅ RIGHT - One dedicated DAG, runs hourly
elementary_monitoring DAG (separate file)
5. Forgetting catchup=False
DbtDag(
    start_date=datetime(2024, 1, 1),
    catchup=False,  # ✅ Always set this or face backfill hell
)
6. Microbatch Without event_time
{{
  config(
    materialized='incremental',
    incremental_strategy='microbatch',
    event_time='created_at'  -- ✅ REQUIRED
  )
}}
7. No Resource Limits on CI
You can also specify specific event_time_start / end (for instance I like to run 1 day only in CI).
# profiles.yml - ci target
maximum_bytes_billed: 10000000000  # 10GB limit
priority: interactive
8. Overlapping DAG Runs
with DAG(
    schedule_interval='0 * * * *',
    max_active_runs=1,  # ✅ Prevent conflicts
):
Pros
| Benefit | Impact |
|---|---|
| Single source of truth | All logic in dbt, Airflow just schedules |
| Automatic incremental logic | No manual date filtering |
| Cost savings | 99% reduction in data scanned (full refresh → microbatch) |
| Tag-based DAGs | Add tag to model → auto-appears in pipeline |
| Built-in observability | Elementary gives anomaly detection, test trends, freshness alerts |
| Developer experience | Devs work in dbt, never touch Airflow |
| Environment parity | Same code in dev/CI/prod, only target changes |
Cost example:
- Before: $5/run × 30 days = $150/month
- After: $0.05/run × 30 days = $1.50/month
- Savings: $148.50/month per pipeline
Cons
| Problem | Why It Hurts |
|---|---|
| Cosmos learning curve | Sparse docs, cryptic errors, small community |
| Microbatch requires discipline | Must have reliable timestamps, not for all use cases |
| Multi-layer debugging | Airflow → Cosmos → dbt → Warehouse (4 layers) |
| Limited Airflow flexibility | Can't easily add custom operators between dbt tasks |
| All-or-nothing deploys | One bad change breaks all pipelines |
| Resource contention | Pipelines compete for warehouse slots |
| Elementary lag | Up to 1-hour delay before seeing test failures |
| Light vendor lock-in | Tied to Cosmos + Elementary + warehouse |
When NOT to Use This
❌ Skip if:
- Team < 3 people (overhead not worth it)
- All models are small, full-refresh is fine
- Need real-time pipelines (< 1 min latency)
- Data has no timestamps
- Need multi-tool orchestration (dbt + Spark + Fivetran)
✅ Perfect for:
- Team size 2-50 people
- Batch pipelines with timestamps
- Growing data volumes
- Need observability without custom tooling
- Multiple environments (dev/staging/prod)
Decision Matrix
| Your Situation | Use This Setup? |
|---|---|
| Batch pipelines + timestamps | ✅ Yes |
| Team 5-50 people | ✅ Yes |
| Growing data costs | ✅ Yes |
| Need observability | ✅ Yes |
| Simple full-refresh only | ⚠️ Overkill |
| Real-time streaming | ❌ No |
| Team < 3 people | ❌ No |
| Multi-tool orchestration | ❌ No |
Bottom line: teams with more than 2 people running batch pipelines will love this. Everyone else should consider simpler alternatives.
Conclusion
You now have a production-ready data platform that handles the full lifecycle: development, testing, deployment, orchestration, and monitoring.
What You've Built
A monorepo with:
- ✅ dbt models using microbatch for automatic incremental logic
- ✅ Dynamic Airflow DAG generation based on dbt tags
- ✅ Environment-specific configurations (dev/preprod/prod)
- ✅ Elementary observability hosted on S3/GCS
- ✅ Automated alerting via email and Google Chat
- ✅ CI/CD with proper environment isolation
The Real Value
This isn't just about tools—it's about developer velocity and operational excellence:
For Developers:
# Add a new model
{{ config(tags=['daily', 'orders']) }}

# It automatically:
# - Appears in the daily_orders DAG
# - Gets monitored by Elementary
# - Runs incrementally with microbatch
# - Sends alerts on failure
No Airflow code changes. No manual orchestration. Just write SQL.
For Operations:
- Costs drop 95%+ (full refresh → microbatch)
- Data quality issues caught within 1 hour (Elementary)
- Clear ownership via tags and team assignments
- One-click backfills via Airflow params
Start Simple, Scale Smart
Don't implement everything at once:
- Week 1: Set up the monorepo + basic dbt project
- Week 2: Add Cosmos DAG generator for one pipeline
- Week 3: Integrate Elementary monitoring
- Week 4: Add CI/CD and notifications
Each piece works independently. Add complexity as needed.
When This Setup Shines
Perfect for teams that:
- Process batch data with timestamps
- Want to reduce warehouse costs
- Need observability without custom tooling
- Value code-driven infrastructure
Not suitable for real-time streaming, tiny teams (<3 people), or multi-tool orchestration needs.
Final Thoughts
The modern data stack is powerful but complex. This architecture gives you:
- Simplicity where it matters (developer experience)
- Sophistication where it counts (incremental logic, observability)
- Flexibility to evolve (add models, pipelines, tests incrementally)
The best data platforms aren't the most complex—they're the ones that get out of your way so you can focus on delivering value.